
Step-by-Step Guide: Setting Up New Analytics 4 Property


Google Analytics 4 has been making a lot of noise recently. It was announced that universal analytics would no longer process data beginning on July 1, 2023, which means your company has a little more than a year to set up the new Google Analytics 4 property and start collecting data.
In this article, we will share some step-by-step instructions to set up and connect the Google Analytics 4 property, also known as GA4.
If you already have a GA4 property set up (whether you set it up or Google set it up automatically) you can connect GA4 and your previous Universal Analytics property to carry over any property settings to your new GA4 property.
Don’t Have Google Analytics? It’s Time to Get an Account!
If you don’t currently have Google Analytics set up on your website or you don’t have a Google Analytics account, then the first thing you will do is set one up.
For those that already have a Google Analytics account, please continue.
To set up GA4, there are a few options. Some are simpler and more straightforward than others, but the process for connecting Google Analytics 4 depends on how your existing Analytics tracking is set up and the capabilities your website must integrate with Google Analytics.
The first thing we will do is create the GA4 property in Google Analytics.
Creating the GA4 Property in Google Analytics
Go to your Google Analytics Dashboard and click on the gear icon or settings in the bottom left corner. In Admin, under the account column, make sure you have the correct account selected. Then go over to the left to the next column for Property and select Create Property.

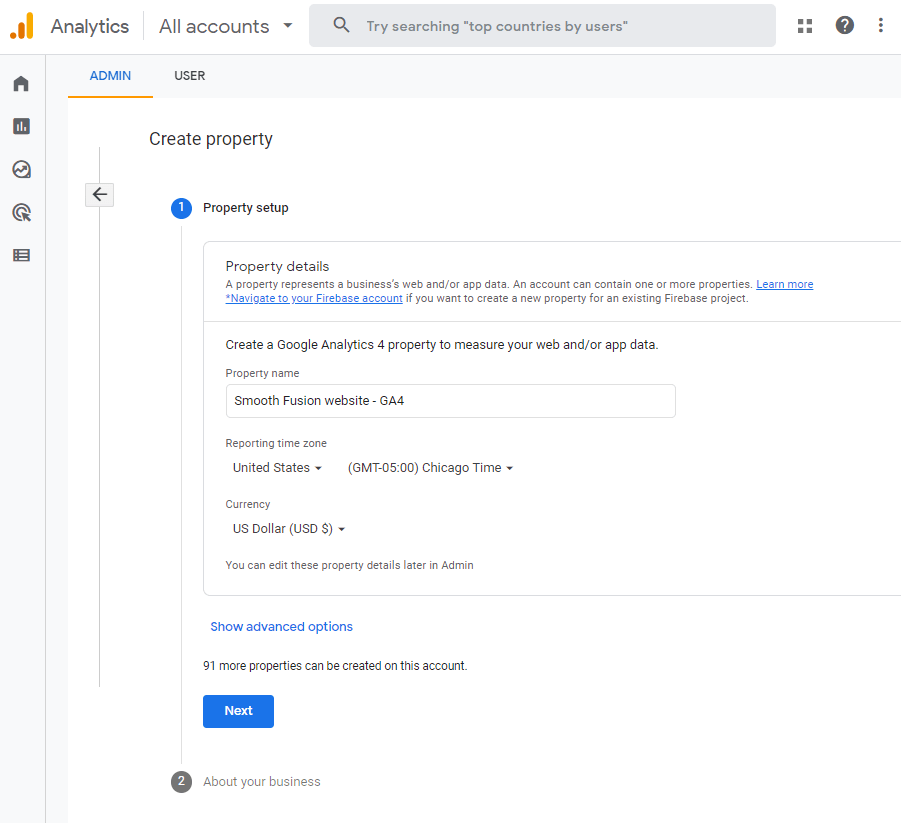
In this section, you will name your property. This can be your business name or any other name that is helpful to identify this property. Remember it will be listed with all other properties you have for this account. Click continue.
Next, there’s some basic information about your business you will give like your industry category, size, and how you plan on using Analytics. Then hit Next.
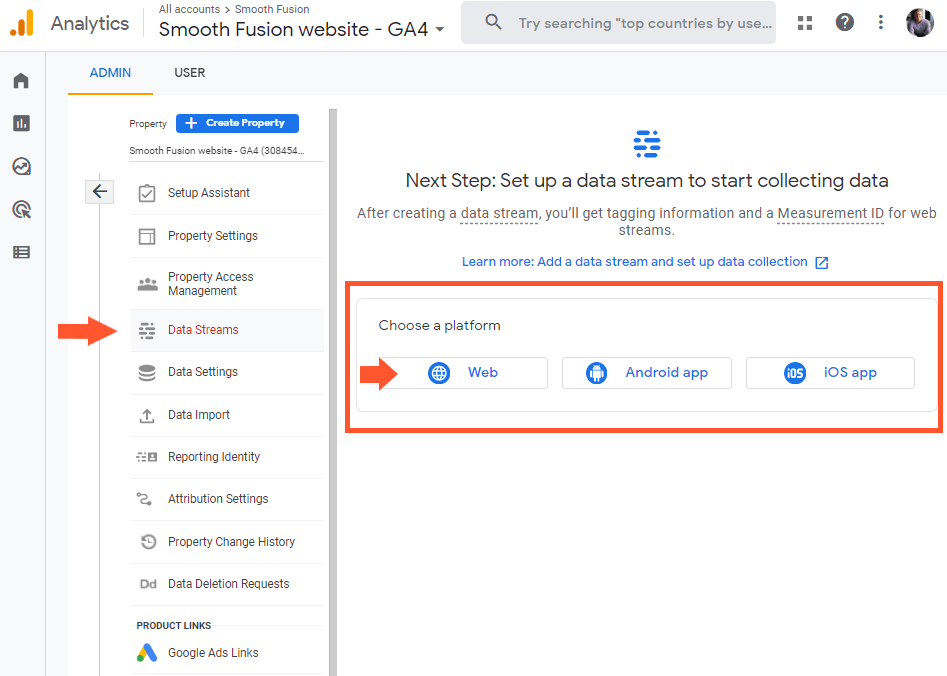
In the next section, you will set up your data stream. If you are adding Google Analytics 4 to your website, then under Choose a platform select Web.
On the next screen, you will set up your new data stream. In the Website URL field, you will put your website, and then for your stream name, I would make it something simple and descriptive that also includes the word “website” since this is the data stream for your website.
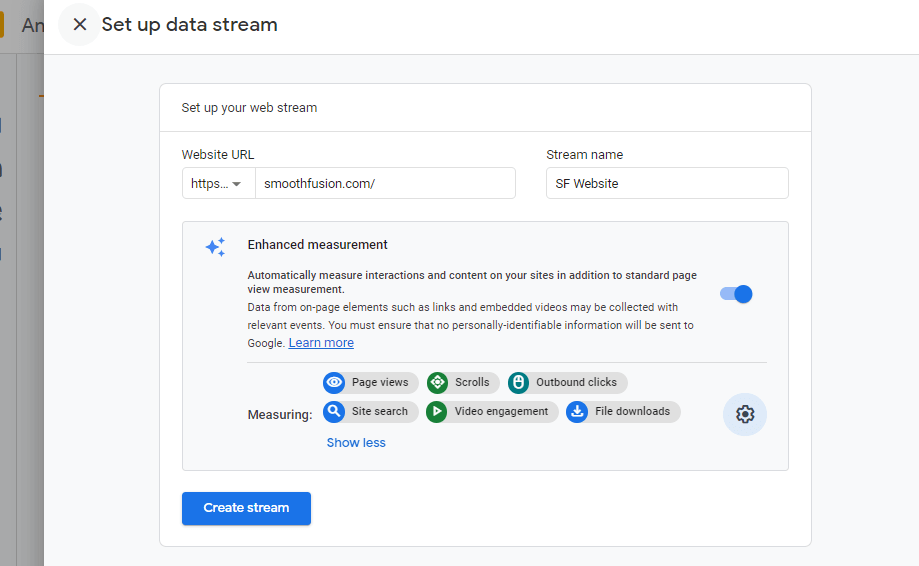
You will see a section for Enhanced measurement. GA4 is based on events, and this asks if you want GA4 to automatically track and measure these common events like page views, scrolls, outbound clicks, site search, video engagement, and file downloads.
If you go to the gear icon, you can turn on or off what will be automatically measured.
Once complete, click on Create stream.
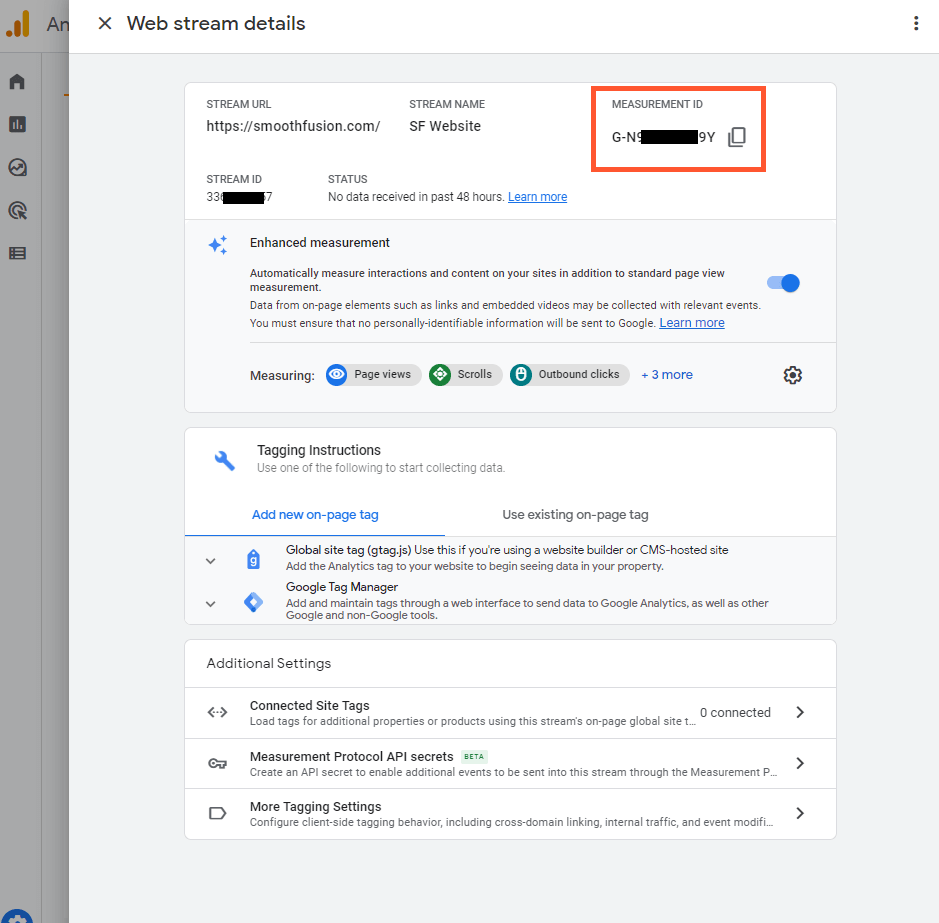
The next screen is very important.
This is the web stream details that has your measurement ID. This measurement ID will be used to complete the set-up, without it you cannot get data from your website to Google Analytics.
How to Setup Google Analytics 4 with Google Tag Manager
Google Tag Manager is a wonderful tool. It allows you to measure all types of website interactions without having to rely on a developer to add code to your site.
This is the reason I would recommend implementing Google Analytics 4 with Tag Manager.
If you haven’t used GTM before, then you will need to set up an account, a container, and will need to install the container (a snippet of code) on your site. The initial setup may require some help from a developer.
Once you've added the Google Tag Manager code snippet to your site and completed the steps to install Tag Manager, you are now ready to configure Google Analytics 4.
In Tag Manager, you will use the GA4 Configuration tag to add Google Analytics 4 to your site.
You will first go to Tags in the left navigation, then select New.
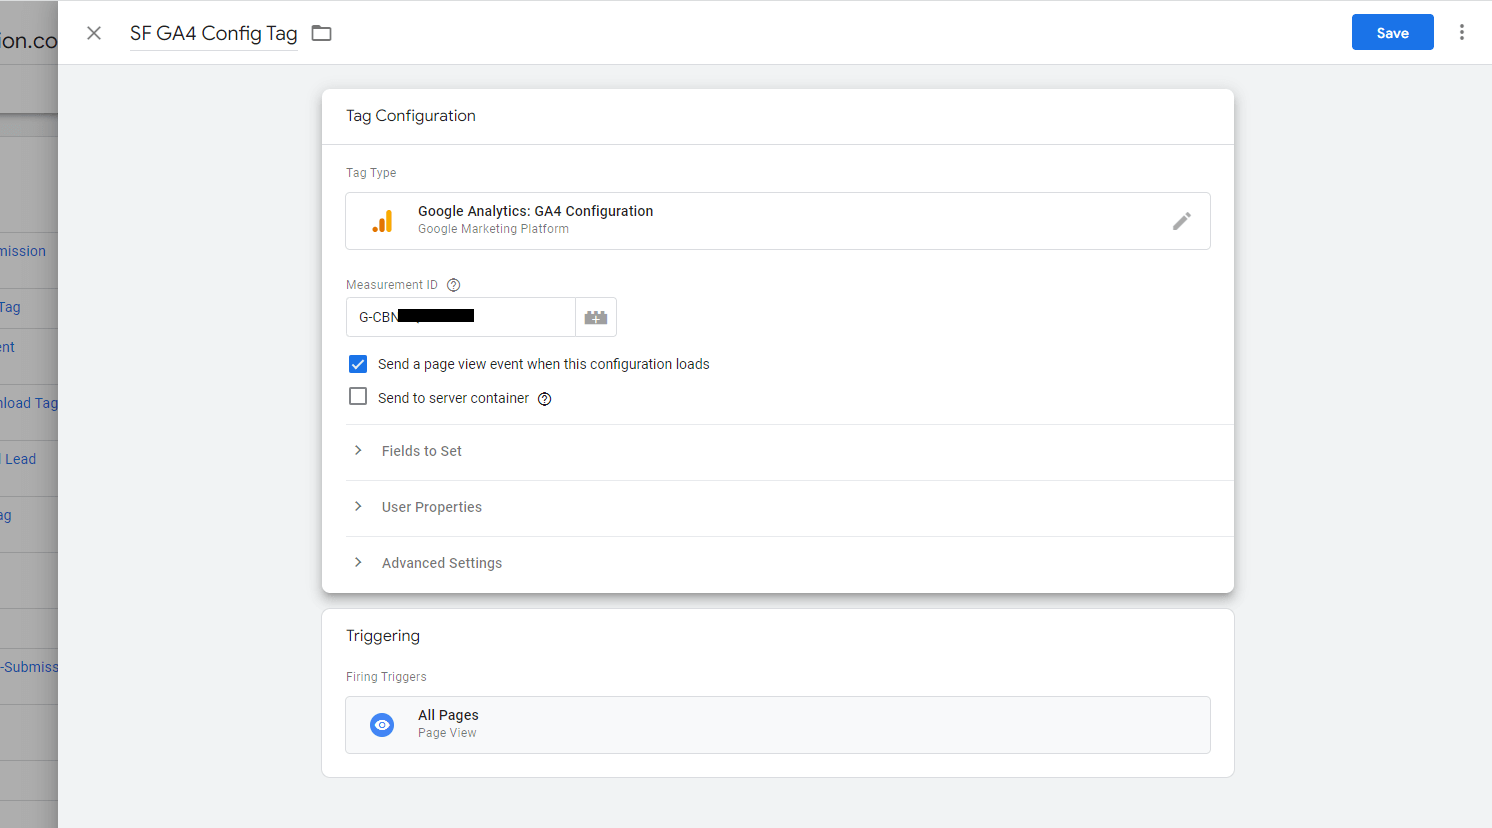
In the section for Tag Configuration, you will click to choose a tag. The tag type you will choose from the list is called, “Google Analytics: GA4 Configuration."
Next, you will add your Measurement ID from the settings in your GA4 Google Analytics property, and then in the Triggering section, you should set the tag to fire on All Pages. (There's been an update to this that adds a trigger that will make the firing of your tag more efficient - see in the section below)
Then click save and then Submit the changes to your website.
If you don’t want to add GA4 with Tag Manager, then we will show you other ways to configure GA4 in these next sections.
Update: Getting your GA4 Tag to Fire Before all Other Events Fire on a Page
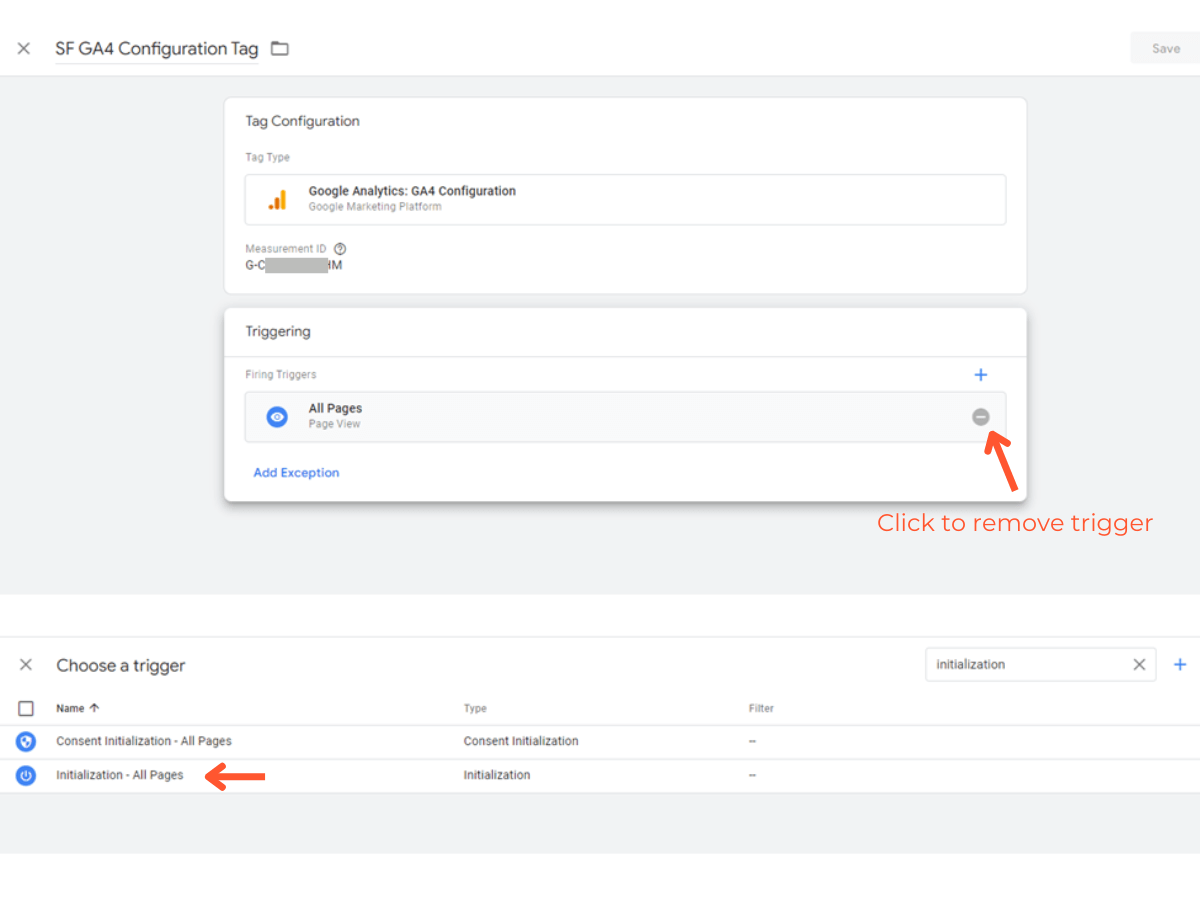
When setting up your trigger for your new GA4 tag, firing on "All Pages" will work but to ensure the tag fires before all other tags fire, you will want to click on the triggering section, and remove the trigger for "All Pages" and then click on "Choose a trigger to make this tag fire..." which will bring up the window to choose a trigger. Search for "Initialization - All pages" and choose this trigger. This will ensure you tag fires before any other tags you have set up on the page.
There will be a "Consent Initialization - All Pages" trigger as well. This isn't the one you will want to use in this scenario.
Do you have the Global Site Tag (gtag.js) on your website?
To collect data on your site, you need to add a code snippet. This code snippet is called a “Global Site Tag (gtag.js)”. In your website source file, you can usually find this by doing a search for <!-- Global site tag (gtag.js) - Google Analytics -->.
Understanding what this code snippet is and how to find it will help you decide the next step to take to add your Google Analytics 4 measurement ID to your website.
Go to Tagging Instructions to see the two options for adding your measurement ID.
Adding a New On-Page Tag
If you did a search for <!-- Global site tag (gtag.js) - Google Analytics --> like we mentioned above and didn’t see this code snippet on your site, then you will follow the instructions under the tab, Add new on-page tag.
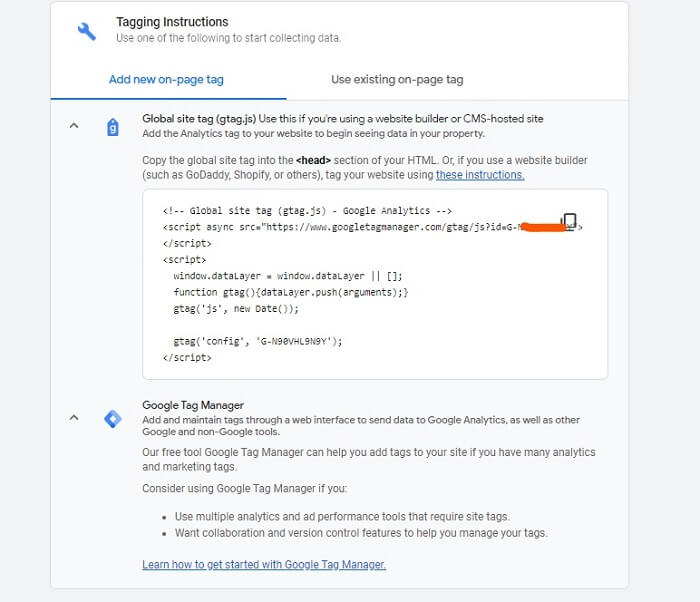
Copy the code snippet in that tab and add it to every page of your website, specifically in the <head> section of HTML.
If you don’t want to add the code snippet to every page manually then opt for a quicker way by adding it to your master page. The settings and elements on your master page will typically carry over to your pages and page templates.
Adding it to the markup of your master page or master page template will carry it over to all other pages on your site. This usually requires a developer, but it will save you a lot of time.
Some content management systems have an easier way to do it or may have specific instructions on adding code to a page head tag so check your CMS documentation to make sure you are doing it correctly.
Using an Existing On-Page Tag
If you do already have the gtag.js or the Global Site Tag on your website then you will follow the instructions under Use existing on-page tag.
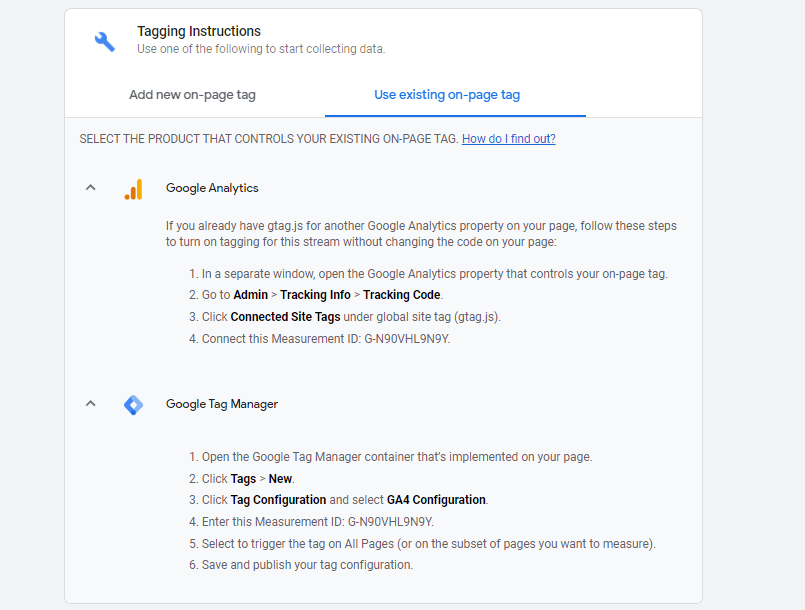
The first choice allows you to update your current Global Site Tag from an existing Google Analytics Property (if you have an existing UA or Universal Analytics Property).
To do this, open Google Analytics in another window, go to the same account and go to your settings/admin screen. Go to an existing UA property.
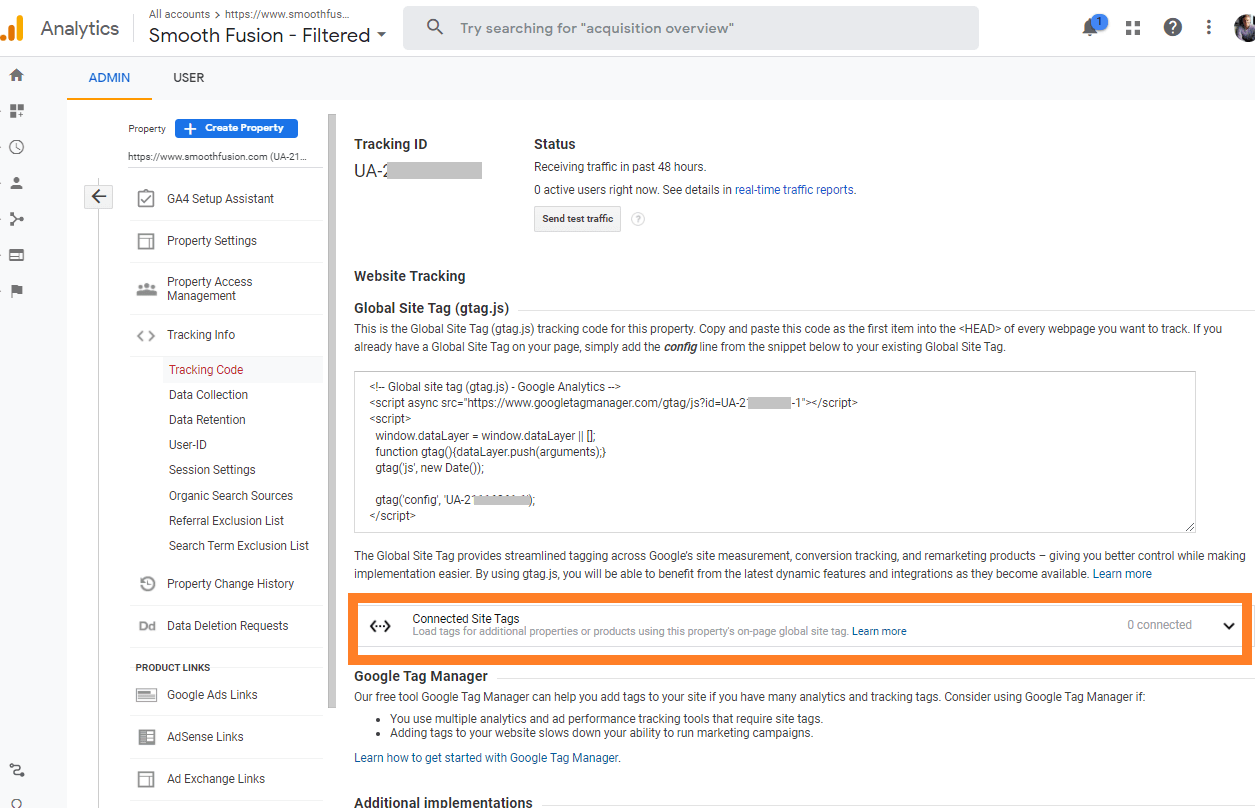
In the property column, under Tracking Info, click on Tracking Code. This next screen will show your Global Site Tag.
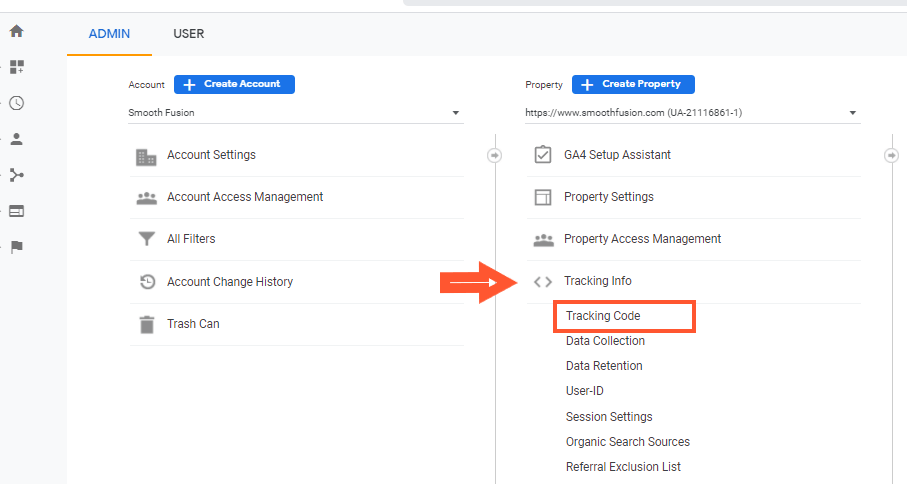
The section underneath your global site tag is where you will find your Connected Site Tags. To connect a Tag, click on the down arrow.
In this window, you will enter the tag ID, which will be the measurement ID you received when setting up your new web stream. You can also enter an optional nickname and then Connect.
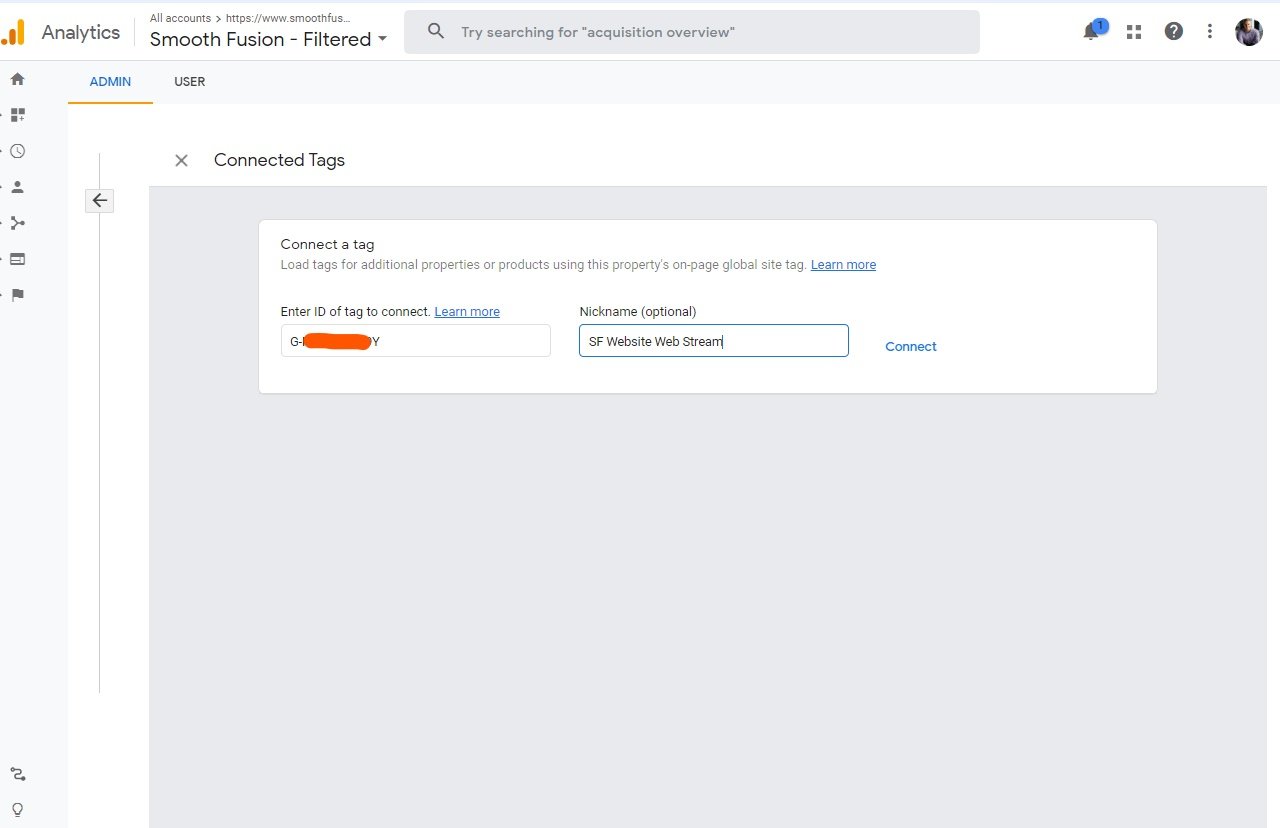
You will now see your new Google Analytics 4 Web Steam connected to your UA properties Global Site Tag.
Setting up through your (CMS) Content Management System
Some content management systems have a feature that allows you to easily connect Google Analytics to your website but most of them currently don’t support the integration with GA4.
The reason is that they accept the “UA-” ID or Universal Analytics ID but to set up Google Analytics 4 you need to use the “G-” ID. It might just take some time before your CMS updates to include this integration with GA4. Until then, I would suggest following the instructions above.
Get Help If You Need To
Especially if your CMS doesn't make it easy to connect to Google Analytics 4, then it is important to find someone who understands Google Analytics and Google Tag Manager. When adding a code snippet to the Master Page or any source files on your website, it is important you get a developer to do this or at least someone who understands code.
If something happens to your Master Page, then it could impact your entire site. This is because as I said earlier in this article, all of your site pages and page templates are based on your Master Pages.
If you have a website that is built on Sitefinity CMS and need help setting up Google Analytics 4, then reach out to our team. We have Google Analytics and Google Tag Manager Certified Specialists that can help you set up GA4 and data analytics services that provide companies with comprehensive website reports.